
Choosing the ideal injection mould tooling for your project is crucial for both part quality and production efficiency. Understanding the types of tooling available can help you make an informed decision that aligns with your production goals. At Sabre Plastics, we prioritise guiding you through the process by presenting options like prototype aluminium, pre-hardened steel, and fully hardened steel moulds.

Prototype aluminium tooling is the fastest to manufacture and is typically ready within weeks, making it ideal for low-volume production runs and design validation. Pre-hardened tooling strikes a balance between speed and durability, suitable for mid-volume production runs and parts requiring a good surface finish. For high-volume projects, fully hardened tooling offers the best durability and quality, albeit with a longer lead time.
Our team excels at designing moulds for maximum longevity by considering factors such as part geometry and material selection. This ensures your tooling delivers optimal performance throughout its lifespan. By carefully selecting the right type of tooling for your needs, we can help you achieve efficient production and high-quality parts.
Key Takeaways
- Understanding tooling types helps in making informed decisions.
- Tooling design and material selection enhance tool longevity.
- Proper tooling selection optimises production efficiency and part quality.
Fundamentals of Injection Moulding Tooling
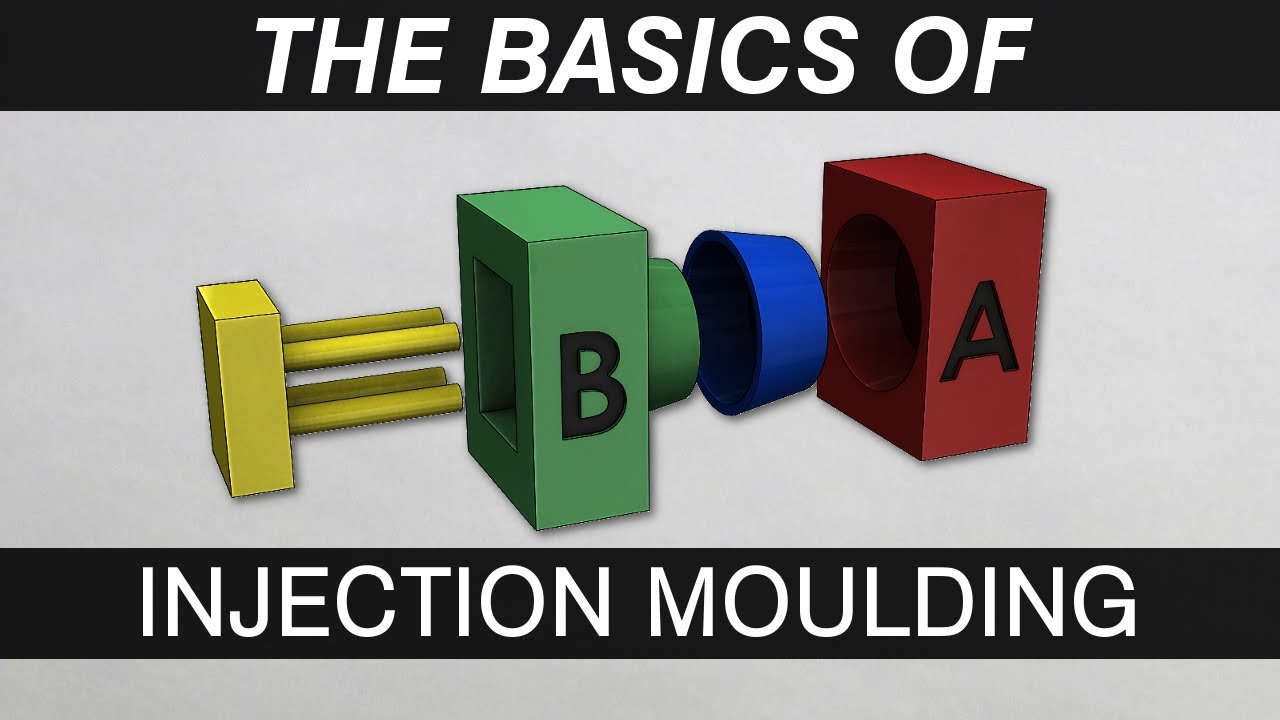
Above is a video explaining the basics of a straight open and shut injection mould tool. With Sabre’s experienced Toolmaking designers Sabre can design Injection Moulds with mechanical slides to allow for undercuts, holes and windows in the side of the component.
Injection moulding tooling is crucial for creating plastic parts. Understanding the basics and materials used can help ensure high-quality results.
Basic Tooling Concepts
A mould tool is made of two halves. These halves form a cavity where molten plastic is injected. The plastic cools and hardens into the desired shape. The halves then separate, releasing the plastic part.
Tooling must be precise to achieve consistent parts. Misalignment or defects in the tool can result in flawed products. Different designs are needed depending on the part’s complexity.
Single-cavity and multi-cavity moulds are common. Single-cavity is simpler but slower, making it suitable for small runs. Multi-cavity can produce multiple parts simultaneously, which increases efficiency.
Types of Materials Used in Tooling
We typically use various steels and aluminium for mould tools. Tool steel is popular due to its strength and durability. Common types include P20 steel, which balances toughness and machinability, and stainless steel, which resists corrosion.
Aluminium is lighter and easier to machine. It suits low-volume production where quick turnaround is needed. However, it wears out faster than steel, making it less ideal for high-volume runs.
Selecting the right material depends on factors like part quantity, complexity, and production speed. The correct choice ensures the mould tool’s longevity and the quality of the final product.
Design Considerations for Mould Tools
When designing mould tools, precision and part geometry play crucial roles. Proper design leads to efficient production and high-quality parts.
Importance of Precision and Tolerances
Precision is key in mould tool design. Accurate moulds ensure parts meet desired specifications. Tolerances define acceptable limits for variations in dimensions. Tight tolerances ensure parts fit and function correctly.
We must account for material shrinkage and thermal expansion. These factors can affect final part dimensions. Manufacturing precision must also be considered to maintain consistent quality.
Mould tools should be designed to achieve desired tolerances. This often involves high-quality machining and rigorous testing. Accurate critical dimensions ensure parts meet performance standards.
Understanding Part Geometry and Complexity
Part geometry affects mould design and production efficiency. Simple, uniform geometries are easier and cheaper to produce. Complex shapes may require advanced tooling and increase costs.
Draft angles are important. They allow for easy removal of parts from the mould. Radii at edges and corners help improve material flow and reduce stress concentrations.
We design for symmetry to ensure even cooling and prevent warping. Long flow lengths can cause issues with filling and packing out. Avoiding thin, protruding sections helps maintain structural integrity.
By considering these factors, we create mould tools that produce high-quality, reliable parts.
Material Selection for Parts and Tooling
When selecting materials for injection moulding, it is crucial to assess the properties of thermoplastics and match them to the requirements of the part being produced.
Properties of Thermoplastics
Thermoplastics offer a range of properties that are essential for various applications. Some key materials include polypropylene (PP), polyethylene, polystyrene, and ABS.
Polypropylene (PP) is lightweight and offers good chemical resistance. It is used in applications where durability and flexibility are important.
Polyethylene comes in various densities—Low-Density Polyethylene (LDPE) and High-Density Polyethylene (HDPE)—each with unique characteristics. LDPE is flexible and used in packaging, while HDPE provides more rigidity and is used in stronger applications.
Polystyrene is notable for its rigidity and clarity, often used in disposable cutlery and CD cases.
ABS (Acrylonitrile Butadiene Styrene) is known for its toughness and impact resistance, ideal for automotive parts and electronic housings.
In addition to base materials, we can enhance thermoplastics with additives and fillers. Additives improve properties such as UV resistance, flame retardance, and colour. Fillers, such as glass fibres, increase strength and stiffness.
Selecting the Right Plastic for the Part
Choosing the correct plastic for a part depends on several factors. We consider mechanical properties such as tensile strength, impact resistance, and flexibility. Environmental factors like exposure to chemicals, UV light, and operating temperatures also play a significant role.
For parts requiring chemical resistance, polypropylene or polyethylene might be ideal choices. If we need a part with high impact resistance, ABS stands out due to its properties.
We also look at the part’s production volume. High-volume production may justify the use of more expensive materials to ensure better durability and consistent quality. Conversely, for limited runs, cost-effective options like polystyrene might be suitable.
By evaluating these factors, we can effectively choose the right plastic that meets both the functional requirements and the cost objectives. This careful selection ensures the final product performs as needed while remaining economically viable.
The Injection Mould Tooling Process
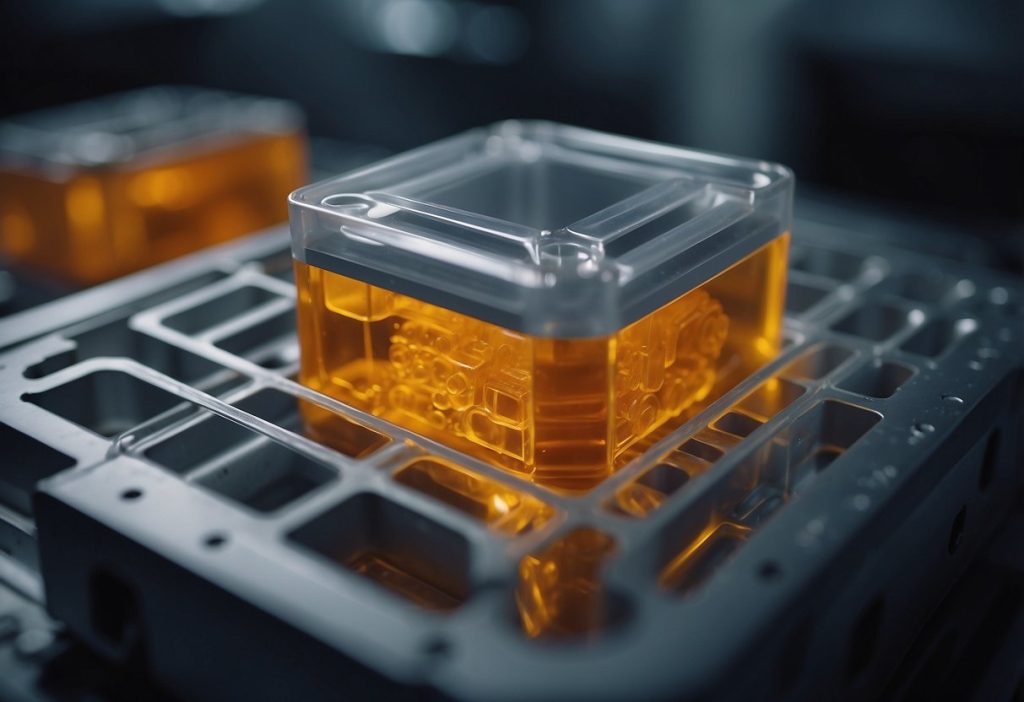
In the injection mould tooling process, several critical steps are involved, from the initial design to creating prototypes and then moving on to different production volumes. Each stage plays a vital role in ensuring the final product meets the desired quality and specifications.
From Design to Prototyping
The journey begins with the design phase. We need to create a detailed blueprint of the mould, considering the complexities of the product. Computer-aided design (CAD) software is often employed to fine-tune every aspect. This precise design helps in identifying potential issues early on.
Prototyping is the next step. Creating a prototype allows us to test and refine our design. Injection moulding prototypes, often made using aluminium tools, are crucial for assessing the tool’s performance. It lets us validate the shape, fit, and material properties of the final product before moving into full production.
By taking these steps seriously, we can avoid costly mistakes and ensure the production runs smoothly. Prototyping is not just a precaution but a necessary step to perfect the injection mould tooling.
Production Volumes and Their Impact
The volume of production significantly impacts the injection moulding process. For low-volume production, we often use less expensive and less durable materials for tooling. This approach is cost-effective but might wear out faster.
In contrast, high-volume production demands robust and durable tools, typically made from hardened steel. These tools are designed to withstand repeated use without compromising the quality of the parts produced.
Choosing the right tooling material for the injection process is critical. It affects the efficiency, cost, and lifespan of the production run. By understanding these differences, we can better plan for our production needs and optimise the injection moulding process for both small and large-scale projects.
Tooling Components and Their Functions
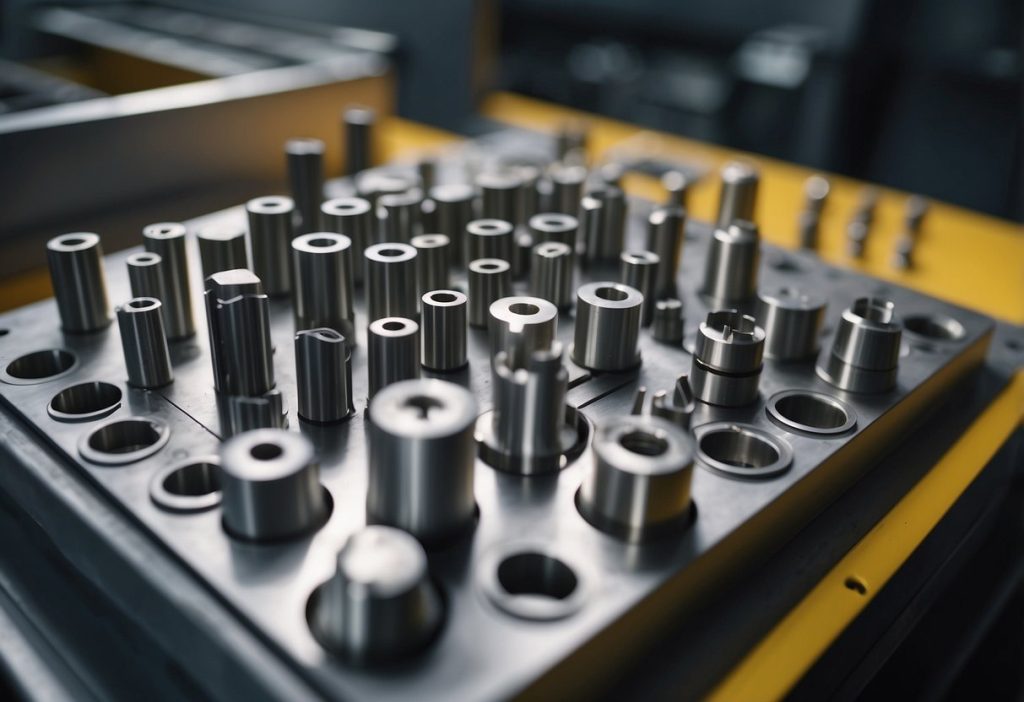
Injection mould tooling includes various components, each with a specific role. Key parts such as the core and cavity shape the final product, while runners, gates, and ejection systems help transport and release the plastic material.
Prototype Aluminium Tooling:
- Speed: The fastest option, typically manufactured within weeks.
- Quantity: Suitable for low-volume production runs (typically under 1,000 parts).
- Applications: Ideal for validating designs, testing functionality, and small-scale production runs.
Pre-Hardened Tooling:
- Speed: A balance between prototype and fully hardened, manufactured in a timeframe of several weeks.
- Quantity: Offers a good mid-range for production runs (up to 25,000 parts).
- Applications: Well-suited for parts requiring good surface finish and dimensional stability, ideal for pilot runs and mid-volume production.
Fully Hardened Tooling:
- Speed: Requires more time for manufacturing due to the hardening process, typically taking several weeks to months.
- Quantity: The most durable option, suitable for high-volume production runs (potentially millions of parts).
- Applications: Ideal for high-volume projects requiring long-lasting performance and the highest quality parts.
Core and Cavity Explained
The core and cavity are essential to creating the mould’s shape. The mould cavity is the hollow portion that defines the outer shape of the product, and the core forms the inner contours. When the mould closes, these two parts come together, creating a space where the molten plastic takes shape.
This precision is vital for ensuring that the final product matches the desired specifications. Typically, they are made from steel to handle the high pressures and temperatures of the injection process. A well-designed core and cavity ensure consistency, quality, and efficiency in the manufacturing process.
Runners, Gates, and Ejection Systems
The runner system channels molten plastic from the injection nozzle to the mould cavities. It includes components like the sprue, runners, and gates. The sprue directs the plastic from the nozzle, while the runners carry it into each cavity through the gates. The design of these pathways impacts material flow and cycle time.
Gates control how the plastic enters the cavity and are crucial for minimising defects. After the plastic cools and solidifies, the part must be ejected from the mould. This is handled by the ejection system, which includes ejector pins that push the final product out of the cavity. This step is essential for maintaining quality and production speed.
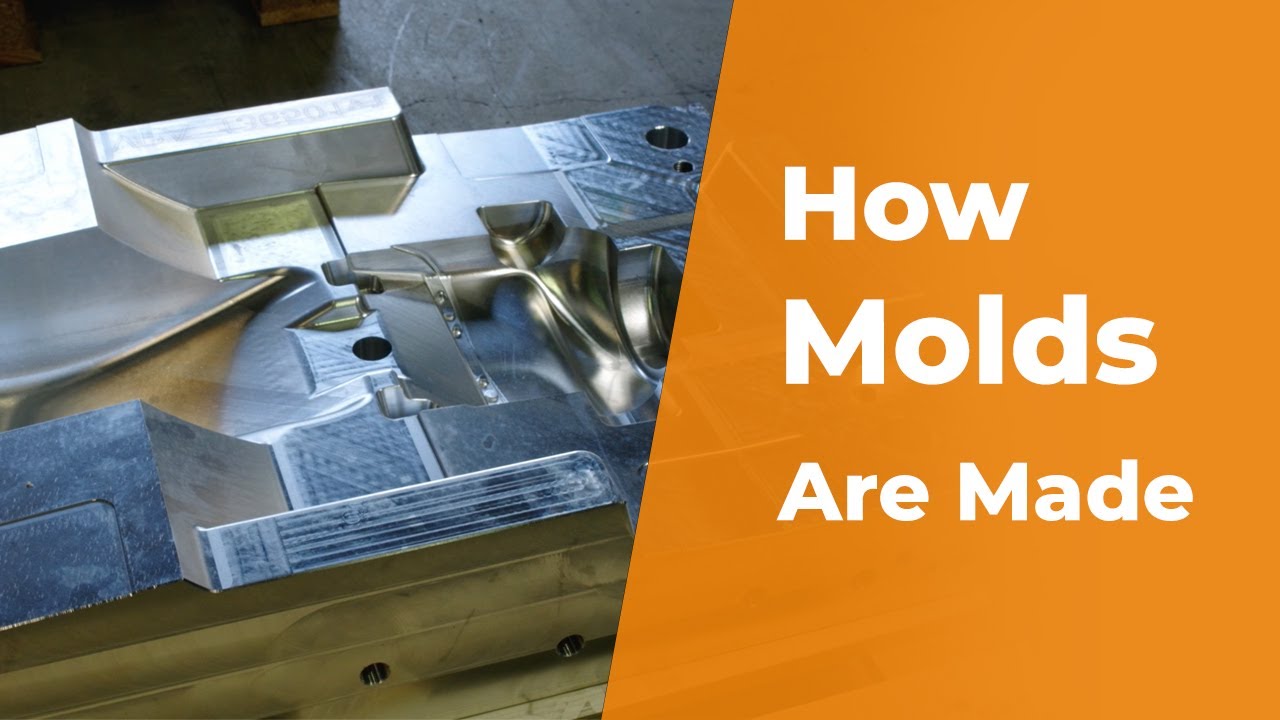
Mould Tool Fabrication Methods
We will explore three key fabrication methods for mould tools: CNC machining, Electrical Discharge Machining (EDM), and advancements in 3D printing. Each technique has its unique applications and benefits.
CNC Machining and Its Applications
CNC machining is a cornerstone in mould tool fabrication. It uses computer-controlled machines to remove material from a solid block, creating precise and complex shapes.
Using CNC machining allows us to achieve high accuracy and repeatability. This method is highly effective for creating cavities and cores of moulds. It is particularly suitable for large moulds requiring tight tolerances and surface finishes.
We commonly use CNC machining to manufacture mould inserts, ejector plates, and cooling channels. The precision of CNC machining helps us minimise post-processing efforts.
Overall, CNC machining is well-suited for producing durable moulds from metals like steel and aluminium.
The Role of Electrical Discharge Machining (EDM)
Electrical Discharge Machining (EDM) comes into play when we need to machine hard materials or intricate features that are difficult to achieve with traditional methods.
EDM utilises electrical sparks to erode material from the workpiece, allowing us to create highly detailed and complex shapes. It is ideal for creating sharp corners, deep cavities, and intricate details in mould tools.
We use EDM for making mould components such as cavities and cores that require very fine details. The key advantage of EDM is its ability to machine hardened materials without causing stress or deformation.
EDM helps us achieve exceptional precision and surface finish, making it indispensable in mould tool fabrication.
Advances in 3D Printing for Tooling
3D printing has revolutionised the way we approach tooling fabrication. Unlike traditional methods, 3D printing builds mould tools layer by layer from CAD models.
This technique allows us to create complex geometries that are challenging for CNC or EDM. We can quickly produce prototype tooling, reducing the lead time and cost associated with traditional methods.
Materials used in 3D printing for mould tools include various metals and high-strength polymers. This flexibility lets us produce tools with integrated cooling channels and other advanced features.
3D printing is becoming increasingly vital in tooling fabrication, offering rapid production and the ability to innovate with design.
By leveraging these three key methods, we can create mould tools that meet a wide range of specifications and requirements.
Enhancing Tool Life and Durability
To extend the life and durability of injection mould tools, it’s crucial to focus on effective maintenance practices and choosing the right materials and treatments. This ensures the tools can withstand the rigours of production and provide consistent performance.
Maintenance Best Practices
Proper maintenance is key to enhancing the life of injection mould tools. Regular cleaning is essential to prevent build-up of residual materials, which can cause wear and reduce tool effectiveness. We should use non-abrasive cleaners and ensure all cavities and vents are free from blockages.
Routine inspections help us identify wear and tear early. By checking for signs of corrosion, pitting, or cracking, we can address issues before they lead to costly downtimes. It’s important to lubricate moving parts regularly to prevent frictional damage.
Implementing a systematic maintenance schedule keeps our tools in top condition. Maintenance logs can help track repairs and identify patterns of wear, allowing us to make informed decisions about tool replacements or upgrades.
Materials and Treatments for Longevity
Selecting the right materials significantly affects the durability of injection mould tools. Tool steel, such as H13, is highly recommended for its hardness and durability under high temperatures. Stainless steel is also an excellent choice due to its corrosion resistance and strength.
Applying surface treatments can further enhance tool longevity. Nitriding increases surface hardness, making the tool more resistant to wear. PVD (Physical Vapour Deposition) coatings add a thin, hard layer to the mould, improving its resistance to abrasion and corrosion.
Heat treatment processes, such as tempering and quenching, help achieve the desired hardness and toughness in the tool steel. These treatments ensure that the tool can endure the high pressures and thermal stresses during the injection moulding process, thereby extending its service life.
Considerations for Part Ejection
When designing mould tooling, it’s crucial to think about how the part will be ejected. This involves understanding the mechanisms and strategies for ejection and addressing any issues with undercuts and complex features.
Mechanisms and Strategies for Ejection
We use various mechanisms to ensure parts eject smoothly from the mould. Ejector pins are commonly used and strategically placed to avoid deforming or damaging the part. Another strategy involves using air blasts to help separate the part from the mould surface.
Sleeve ejectors and stripper plates can also be utilised, especially for larger or more delicate parts. These mechanisms distribute the ejection force more evenly, reducing the risk of part damage. For more detailed strategies, you can explore this technical resource on injection mould tooling.
Dealing with Undercuts and Complex Features
Undercuts and complex features require special considerations. We might use side actions like lifters or sliders to allow the mould to open without damaging the undercut areas. These components move laterally before the main ejection to release the undercuts.
Collapsible cores are another solution for intricate internal features. They collapse inward to free the part, allowing it to be ejected uniformly. Designing symmetrically when possible helps ensure even cooling and shrinkage, which also facilitates smoother ejection.
For more design tips, check out tips on part and mould design considerations.
Quality Control in Tooling
Ensuring the quality of injection mould tooling is critical for achieving precise and consistent plastic parts. We focus on key aspects such as accuracy, consistency, and defect mitigation to maintain high standards in the tooling process.
Assuring Accuracy and Consistency
To achieve accuracy, we utilise Computer-Aided Design (CAD) and Computer-Aided Manufacturing (CAM) systems. These technologies allow us to create detailed and precise mould designs.
Our team regularly performs dimensional checks using Coordinate Measuring Machines (CMM). This ensures each tool meets exact specifications.
We also use high-quality materials like steel for moulds, as it maintains its shape under high pressure. The consistency of our moulds directly impacts the plastic parts’ quality and reduces variations between batches.
Regular calibration of machines and tools is essential. We conduct periodic assessments to ensure the equipment remains accurate and reliable.
Mitigating Defects like Warp and Flash
Defects such as warp and flash are common in injection moulding but can be mitigated with proper control measures.
To prevent warping, we ensure even cooling throughout the mould. Uneven cooling causes parts to shrink differently, leading to distortions. We adjust the cooling system and monitor temperatures closely to avoid this issue.
Flash, the excess material on the edges of the moulded part, occurs when moulds are not tightly clamped. We regularly inspect moulds for wear and ensure they fit together perfectly.
Using simulation software helps us predict and mitigate potential defects. By analysing the moulding process beforehand, we can identify and correct issues before mass production begins.
Quality control in tooling requires a vigilant approach to maintain high standards and deliver superior plastic parts.
Cost and Lead Time Optimisation
In injection mould tooling, it is crucial to manage both cost and lead times effectively. By striking a balance between cost and quality, while implementing strategies to reduce lead times, we can achieve significant efficiency improvements.
Balancing Cost with Quality
Balancing cost with quality is essential. Tooling expenses can be high, particularly with the use of premium materials like wear-resistant steels, which are more expensive but offer longer tool life and lower maintenance costs.
We need to consider material costs as well. Plastic resins vary widely in price, ranging from about £2.40 to £16 per pound, depending on the type and quality.
Using cost-effective materials does not mean compromising on quality. By selecting the right materials and ensuring optimal design, we can minimise costs without sacrificing performance. For instance, simplifying mould designs where possible reduces complexity and cost, reflecting positively in the final product quality.
Close attention to overhead expenses such as energy consumption and labour can further enhance cost-effectiveness. Automated processes and advanced monitoring systems can identify inefficiencies and help in reducing these expenses.
Strategies for Reducing Lead Times
Reducing lead times is vital for improving productivity. Efficient project management plays a significant role in minimising delays. Careful planning and scheduling ensure that each stage of the injection moulding process flows smoothly.
Real-time tracking systems are crucial. They allow us to monitor the production cycle, identify bottlenecks, and address issues promptly. This proactive approach prevents minor problems from escalating into major delays.
Another effective strategy is to implement process optimisation techniques. By continuously evaluating and improving our procedures, we can streamline operations, reducing the time required for each cycle. Techniques like optimising cooling times and using high-efficiency moulding machines significantly cut down lead times.
Finally, proper maintenance of equipment is essential. Regular inspections and timely repairs prevent unexpected breakdowns, ensuring that production schedules remain on track and reducing costs associated with downtime.
Customisations and Special Features
When designing injection moulds, customisations are essential for meeting specific project needs. We explore how to integrate text and logos, and consider the benefits of designing for multiple cavities.
Integrating Text and Logos
Incorporating text and logos in moulds can greatly enhance product branding and identification. This process requires precision to ensure that the features are clear and durable.
Text and logos are often engraved or etched directly into the mould. This technique ensures that each moulded part comes out with a consistent and professional appearance. The depth and style of the engraving must be carefully considered to maintain legibility without compromising the integrity of the part.
Choosing the right materials for the mould is crucial. Wear-resistant steels are preferred to withstand the additional abrasion from the text and logo details. Proper cooling systems in the mould can also help maintain the quality of these fine details by reducing warping and stress during cooling.
Designing for Multiple Cavities
Designing moulds with multiple cavities can significantly improve production efficiency. By creating several parts in a single moulding cycle, manufacturers can reduce cycle times and increase output.
When designing multiple cavities, balance is key. The molten plastic must flow evenly to each cavity to ensure uniformity in the final parts. Uneven flow can result in parts with different dimensions or defects.
Using hot runner systems can help with achieving even distribution of the molten plastic. These systems keep the plastic in a molten state as it travels through the mould, preventing premature cooling and blockage.
Mould materials must be chosen carefully to handle the increased stress from multiple cavities. High-quality steels and robust cooling systems help maintain precision and extend the life of the mould.
Advanced Tooling Techniques
In advanced injection mould tooling, incorporating sophisticated features and considering high-pressure injection requirements are critical for creating complex, high-quality parts.
Incorporating Sophisticated Part Features
When developing advanced injection moulds, we often include features such as inserts, sliders, and lifters. Inserts, for example, allow us to integrate metal components into the plastic part, improving its functionality.
Sliders and lifters are used to create undercuts and complex shapes that a simple straight-pull mould cannot achieve. These components add complexity to the mould design, but are essential for creating intricate parts.
We also use multi-cavity moulds, which allow us to produce several parts in a single moulding cycle. This not only saves time but also ensures consistency across all parts. The use of hot runner systems further improves efficiency by maintaining the plastic material in a molten state, reducing waste and cycle time.
Such sophisticated features require precise engineering and thorough testing to ensure they work seamlessly during the injection moulding process.
High-Pressure Injection Considerations
High-pressure injection is crucial in advanced mould tooling. This technique ensures that molten plastic flows quickly and uniformly into the mould cavity, reducing the risk of defects.
We must carefully consider the mould material, as high-pressure injections can stress the mould. Steel is commonly used due to its durability and strength under pressure.
Ensuring proper venting in the mould is essential. Poor venting can lead to defects such as burn marks or air traps. Additionally, cooling systems must be optimised to handle the higher thermal loads, ensuring parts solidify correctly without deforming.
Accurate pressure control is key. Machines must maintain consistent pressure levels throughout the injection process to produce high-quality parts. Regular maintenance and calibration of injection moulding equipment are also necessary to maintain optimal performance under high-pressure conditions.
Careful design and regular monitoring help us achieve precise, defect-free parts using high-pressure injection techniques.
Post-Processing and Secondary Operations
In injection moulding, post-processing and secondary operations are vital for ensuring the final product meets quality and functionality requirements. These processes enhance surface quality and prepare parts for assembly.
Manual and Automated Finishing Options
Post-processing often involves both manual and automated methods to remove imperfections and enhance the product’s appearance. Manual finishing includes techniques like:
- Deburring: Removing sharp edges and excess material.
- Hand sanding: Smoothing surfaces and improving texture.
Automated options include:
- Robotic trimming: Precision cutting and consistent results.
- CNC machining: Enhancing part details and accuracy.
Both methods have their benefits. Manual techniques offer flexibility and thoroughness for intricate parts. Conversely, automated processes provide speed and repeatability, making them suitable for large production volumes.
Assembly and Post-Processing Requirements
Assembly processes are another critical step after initial moulding. They can be either manual or automated, depending on the complexity and production scale. Some common manual assembly tasks include:
- Hand inserting: Placing components like screws or connectors.
- Adhesive bonding: Manually applying glue for part assembly.
Automated assembly, on the other hand, uses:
- Robotic systems: Precise and efficient component placement.
- Heat staking: Applying controlled heat to join parts without fasteners.
We must consider the specific post-processing requirements such as painting, laser marking, or adding threaded inserts. These processes ensure the final product not only looks good but also functions as intended. For example, painting and laser marking add aesthetic and practical value to the parts.
Applications and Industry Case Studies
Injection mould tooling is used across various industries due to its versatility and precision. Below, we explore specialised applications in different sectors and highlight case studies demonstrating moulding process optimisation.
Specialised Applications in Different Industries
Injection moulding finds use in many sectors. In the automotive industry, it produces lightweight components like bumpers and dashboards. These parts are essential for modern vehicles, helping reduce weight and improve fuel efficiency.
In medical fields, moulding enables the mass production of high-precision, sterile single-use items, such as syringes and surgical instruments. This is crucial for maintaining hygiene and reducing cross-contamination risks.
Consumer electronics rely on injection moulding for housings and structural components in devices like smartphones and laptops. The ability to produce intricate designs with high consistency makes injection moulding ideal for these applications.
In the packaging industry, injection moulding produces items like bottle caps and containers. These products require durability and precision, ensuring they function correctly in protecting their contents.
Frequently Asked Questions
We have gathered some common questions regarding injection mould tooling to help you understand the process better.
What are the essential steps involved in injection moulding?
Injection moulding starts with melting plastic granules. The molten plastic is then injected into a mould cavity under high pressure. Once cooled, the plastic solidifies and is ejected as a finished part. This process is repeated for the desired number of parts.
How is an injection mould tool typically manufactured?
Injection mould tools are typically manufactured through precision machining methods. These include CNC milling, turning, and sometimes EDM. The process ensures that the mould’s dimensions meet exact specifications to produce consistent and high-quality parts.
What factors influence the design of injection moulding tools?
Several factors influence the design of injection moulding tools. Material selection, part geometry, wall thickness, and cooling time are crucial in determining the tool design. Additionally, the number of cavities, gating system, and ejection mechanism are also considered.
Can you outline the basic principles of mould design?
The basic principles of mould design involve creating a mould that can be filled efficiently and produce parts with consistent quality. This includes designing appropriate gating systems, considering shrinkage rates, and ensuring uniform cooling. Attention to ejection mechanisms is also important for easy removal of parts.
What materials are commonly used in the creation of injection mould tools?
Common materials used in making injection mould tools include hardened steel, aluminium, and some high-grade alloys. Hardened steel is preferred for high-volume production due to its durability. Aluminium can be used for prototype and low-volume runs due to its lower cost and ease of machining.
What considerations are critical when sourcing injection moulding tools for sale?
When sourcing injection moulding tools, consider the supplier’s reputation, quality control processes, and the materials used. It’s also important to evaluate the lead time, cost, and after-sales support. Ensuring that the tools meet your specific production requirements will help avoid future issues.
Choosing the Right Tool for You
The best injection tooling solution depends on your specific project requirements. Consider factors like production volume, part complexity, and desired turnaround time. Our experienced team is here to guide you through the selection process and recommend the most cost-effective and efficient tooling solution for your needs.
Contact Sabre Plastics Today
Let’s discuss your project and find the perfect injection moulding tool for your application. Contact Sabre Plastics today for a free consultation.